Businesses, no matter how big or small, need to constantly stock up on items to run their day-to-day operations smoothly. EZOfficeInventory offers a reservation service that allows you to reserve items in advance so they are available when you want to view them.
You can make conflict-free and conflict-free bookings simply by checking the asset’s available calendar. This way you know what items are available for pre-order and can set your pre-order quantities accordingly. In addition to this, you can also reserve a certain amount of stock items for a specific location and date.
benefit
Here are some of the key benefits of booking in EZOfficeInventory:
- Prevent double bookings: You can manage your assets well by booking them for specific periods and avoid overlapping bookings. No one asset is retained for two different purposes at the same time, ensuring the smooth running of operations.
- Enhance coordination: By avoiding interdepartmental conflicts over commonly used assets, you can improve resource utilization and promote collaboration within your team. All teams will have clear visibility into booking status, allowing them to plan their events accordingly.
- Strengthen accountability: You can easily assess which users booked specific items and for what purpose. This increases transparency and makes it easier to trace the person responsible for an asset if it is lost or misused.
- Report: You can generate detailed reports to evaluate where, how and when your assets are used. Reports provide a comprehensive summary of your booking assets, letting you understand the number of bookings, self-service bookings, and the average time to resolve these issues.
- Quick analysis: Users can instantly evaluate the duration, date and location of their reservation on the booking details page. They can edit the reservation – cancel or extend it as needed. With the new “Proximity” option, they can even set the time period/days they want to see bookings for easier analysis.
NOTE: This blog will take you through booking based on the updated UX/UI. You can now use the booking module faster and better.
1. Product reservation
You can use the booking feature to perform multiple actions on your assets. See below!
1. Book through the product details page:
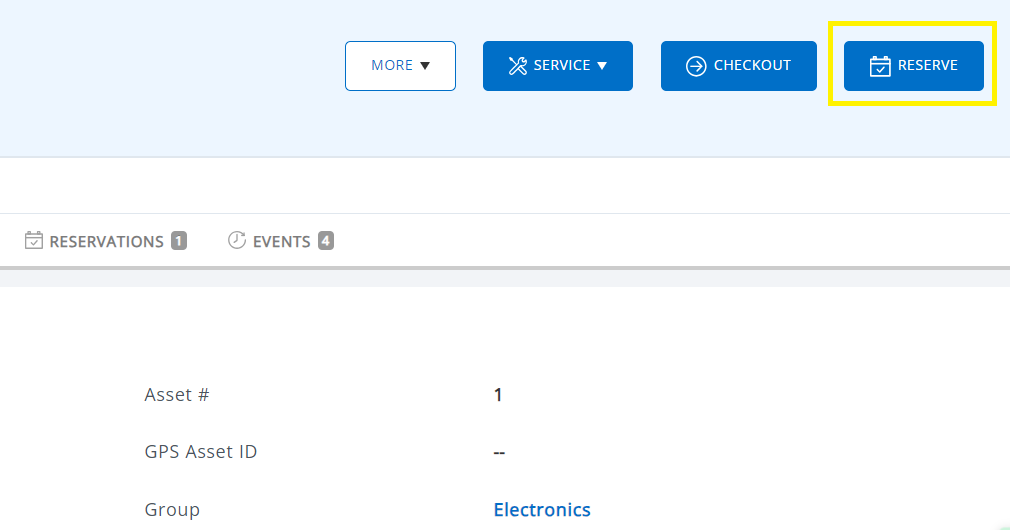
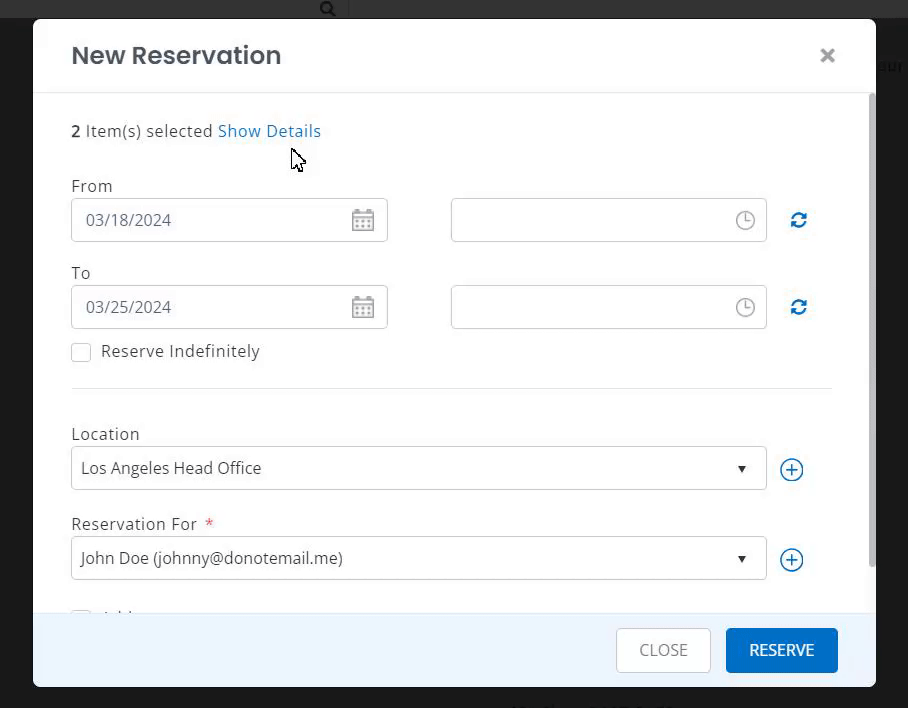
You can reserve an item by going to the asset details page. Click “Keep” and the following overlay will appear.
In the overlay, indicate the duration of the reservation and who it is for. You can also add notes to your booking, which can be viewed under the Locations tab.
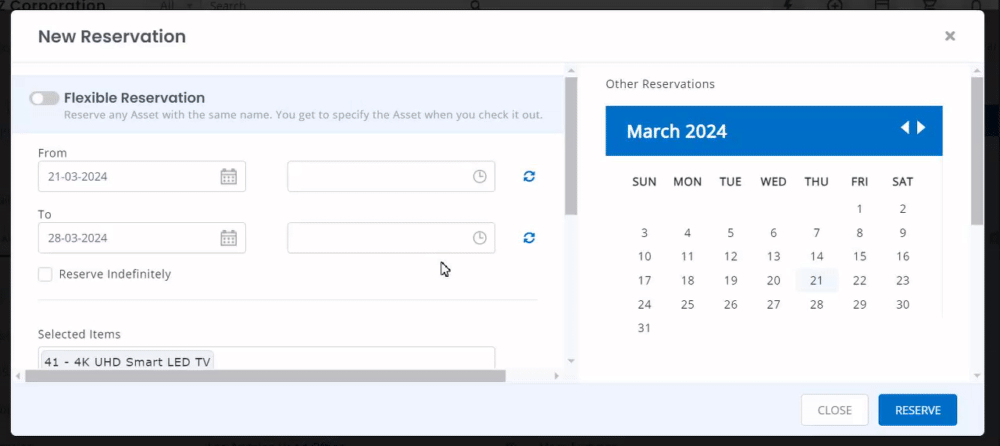
If you have multiple projects with the same asset name, you can enable the Flexible Reservation toggle to specify which assets to assign.
2. Add new users and locations to your booking
You can add new users and locations when booking an item. Just click “Add” next to “Locations” or “Bookings” on the overlay above. Another dialog box will pop up prompting you to create a new user or location for this subscription.
You can add new users and locations when booking a project via:
- Asset booking (from the asset details page)
- Bulk booking (from product list page)
- Cart reservation (from cart details page)
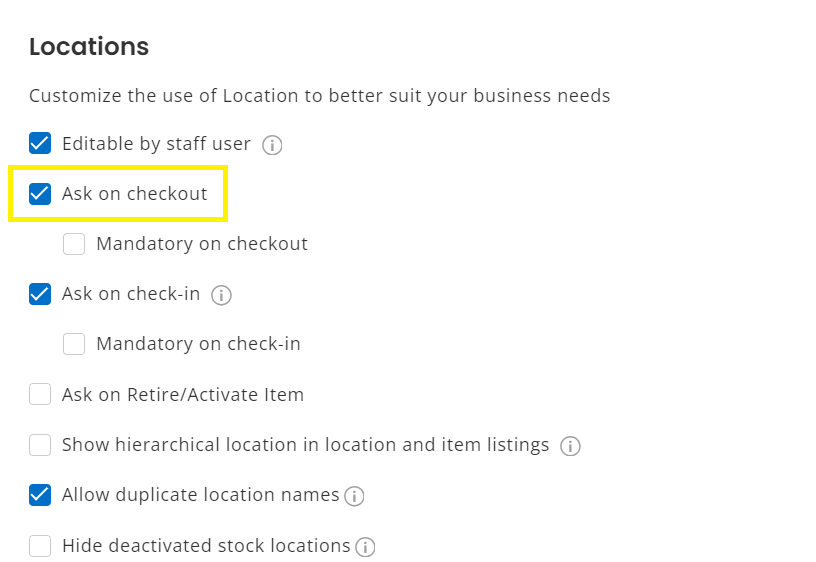
notes: To add a new location, the “Ask at checkout” option must be enabled in: Settings → Company Settings → Locations.
3. Batch reservation
Multiple items can be retained at once (assets only).
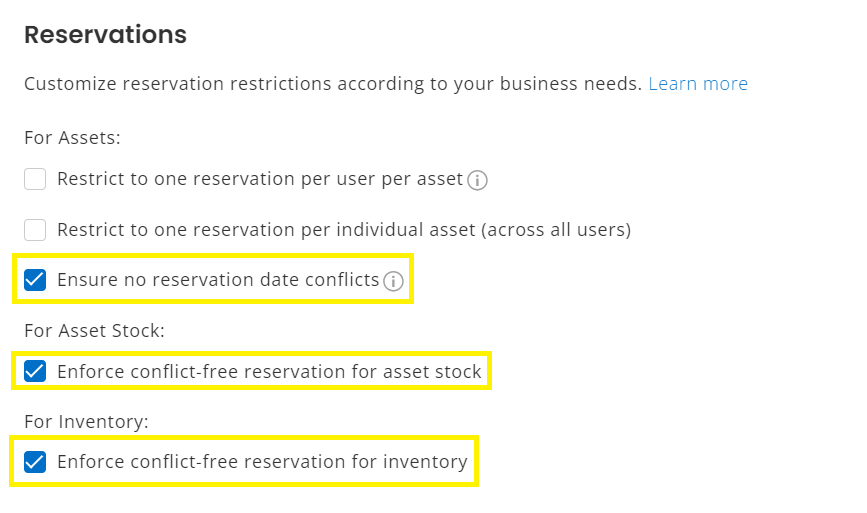
However, if the item has any conflicts with other bookings, an error message will be displayed.Enable conflict-free bookings set up → Company settings → Bookings.
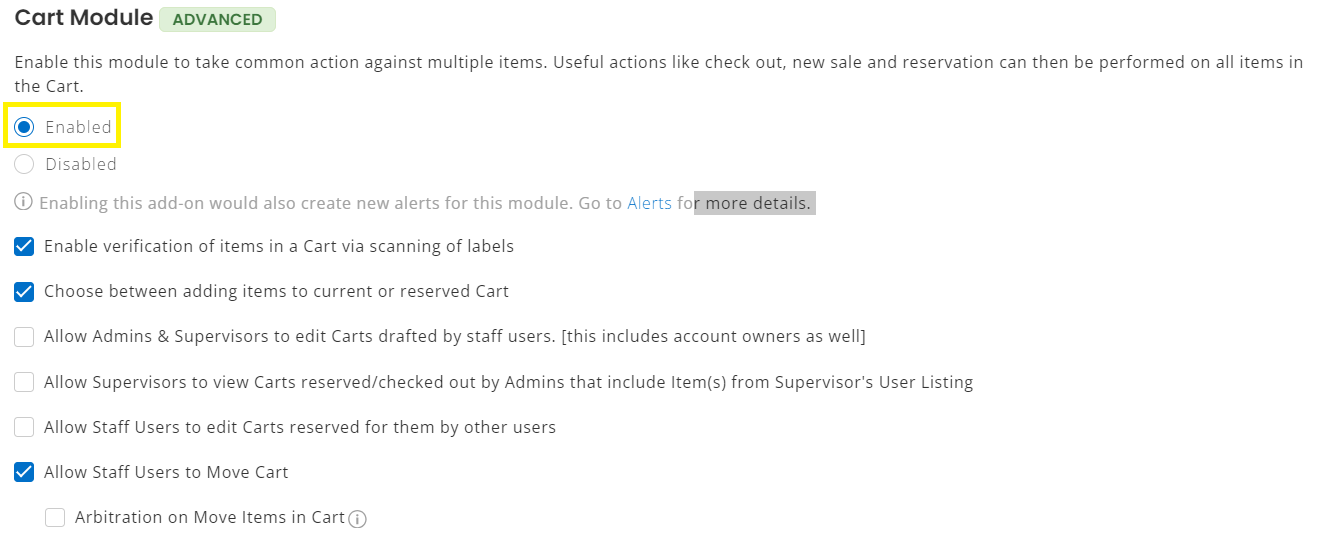
4. Reserve items via shopping cart
You can also add multiple items to your cart and place a reservation. This will work if you enable the “Shopping Cart Module” from: Settings → Add-ons.
Select the relevant item and click “Add to Cart”. You can reserve your cart now by going into your cart and clicking “Reserve.”
Reserved cart items can be edited on the overlay. Items can be removed or added, giving you greater control over their device management.
Let’s say you pre-ordered something for the CES show, but underestimated the number of VR headsets you’d need. With the latest enhancements, last-minute shopping cart reservations are no longer a worry.
5. Bookings tab in asset details page
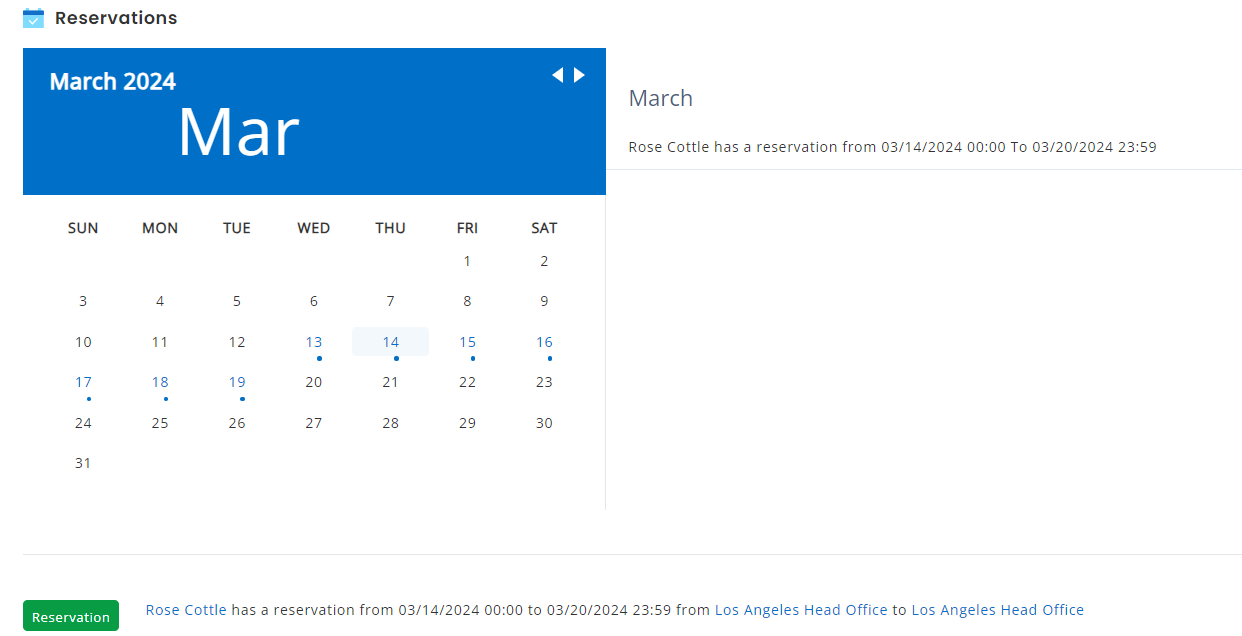
When booking an asset, you can easily view its availability schedule, i.e. other bookings and current checkouts. You can do this by clicking on the Bookings tab on the details page.

With this information, people can choose the right booking dates and avoid conflicts. Notice in the screen below, how the Bookings tab on the Asset Details page provides a birds-eye view of this information.
You can perform actions in this view to edit or cancel reservations and check out reserved assets, as follows:

If multiple bookings cause conflicts at checkout, you can override them as an administrator. Employee users can only do this for their subscriptions (if they can see the asset according to company settings). Alternatively, you can choose a different closing date to avoid any scheduling conflicts.
2. Schedule an action
You can access the booking page via the bell icon in the upper right corner of the screen.
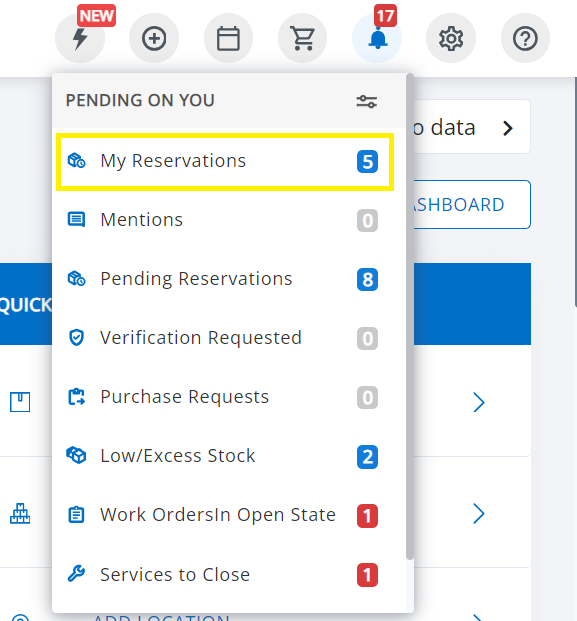
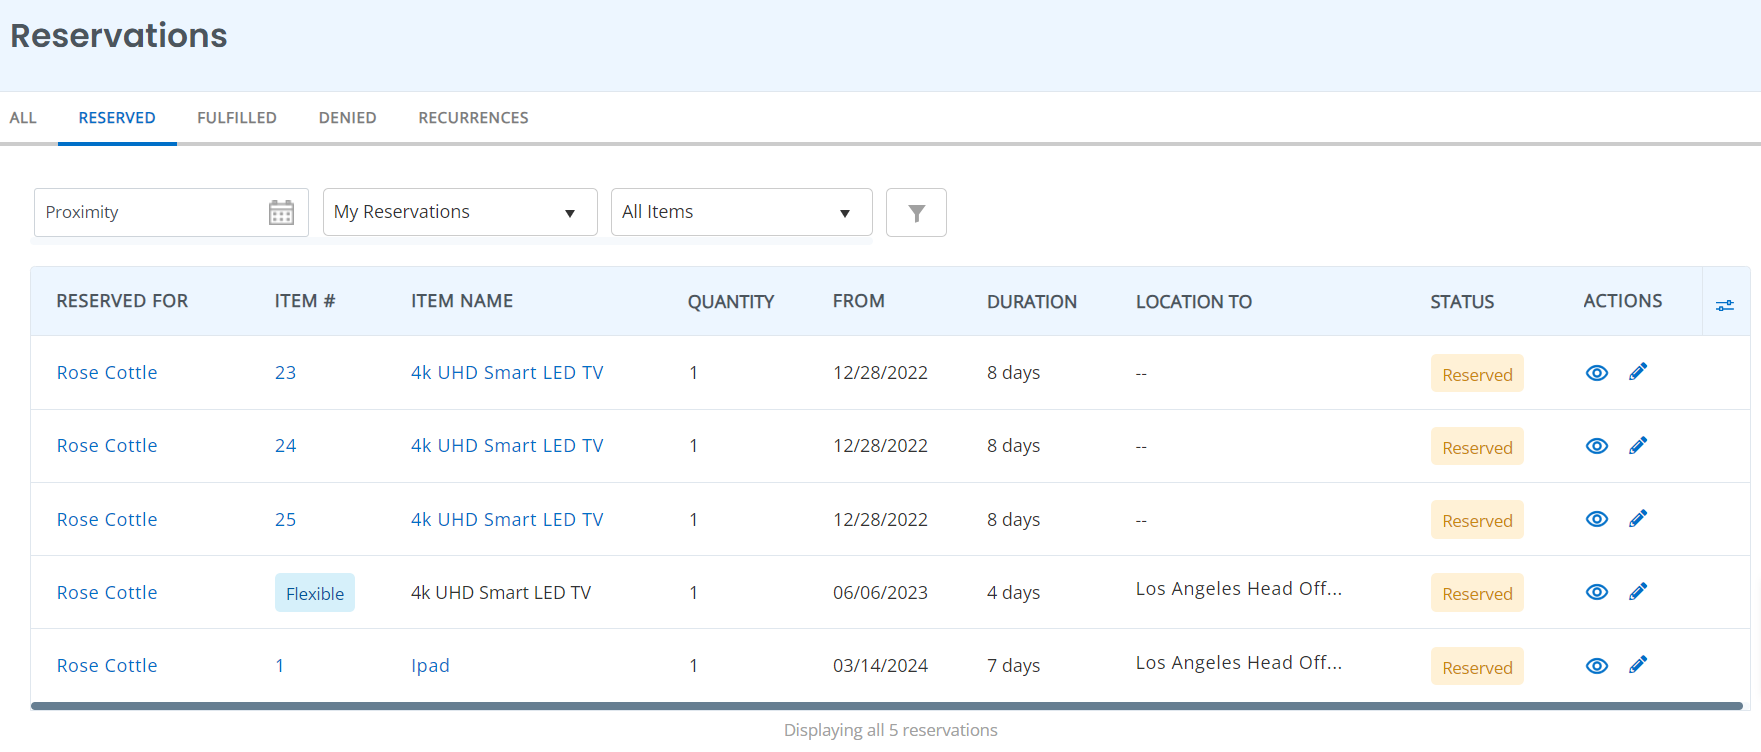
When you click on “My Bookings” you will be taken to the following booking details page which displays details for all bookings. You can perform several actions from here, such as filtering and editing bookings.
Additionally, as an administrator, you can view all member’s bookings and take necessary actions.
You can also check “Booked”, “Completed”, “Rejected”, Booked and “Duplicate”.
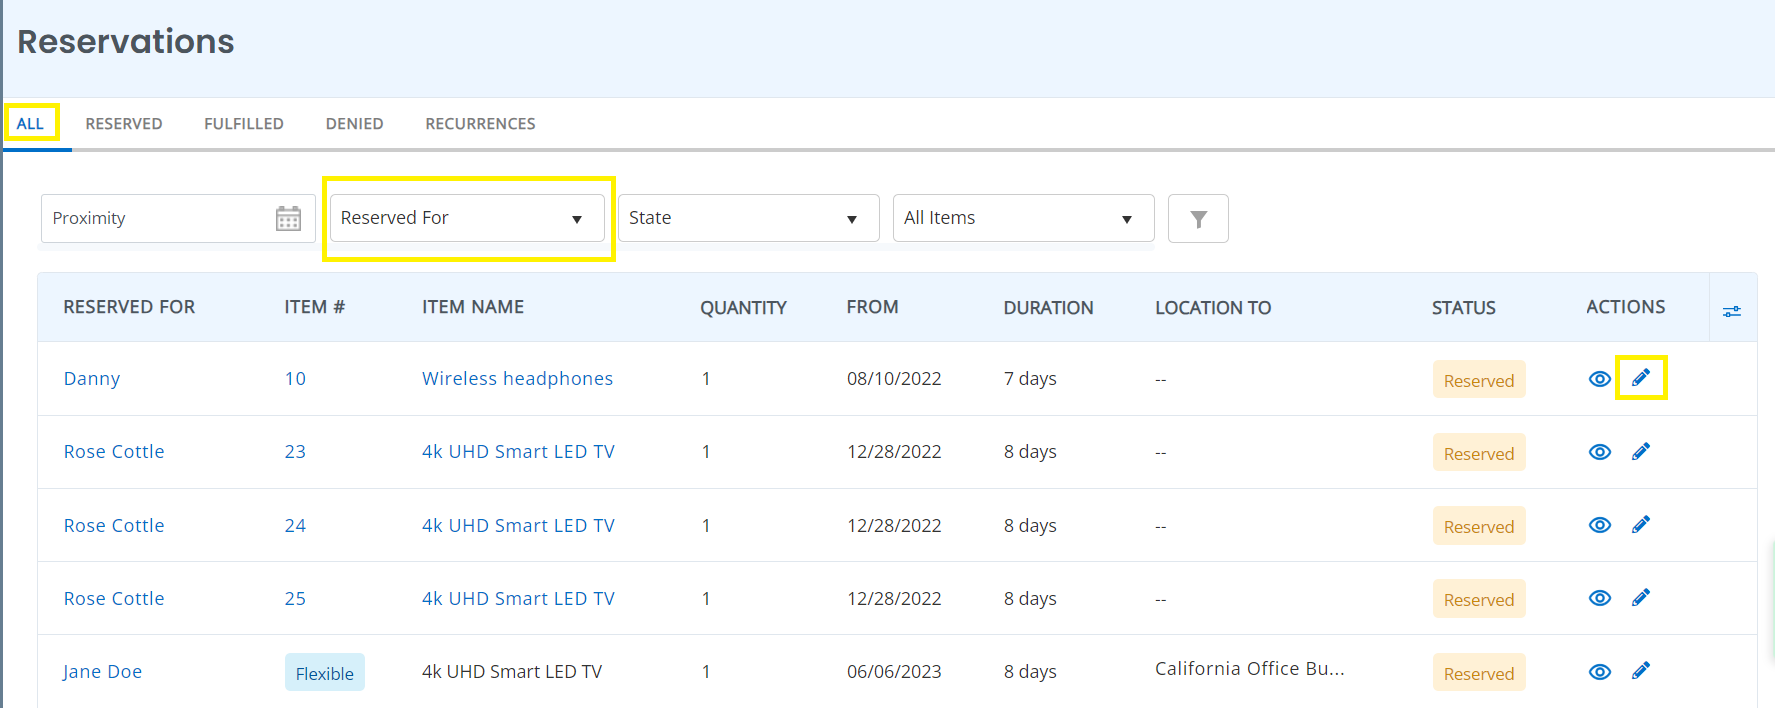
Here are some important elements to note on the booking details page:
1. Proximity
You can define the time period during which bookings are to be displayed. These are the number of days between the current date and the booking start date (past and future). For example, if we select “Within 15 days”, all bookings within 15 days from now and 15 days before the current date will be displayed.

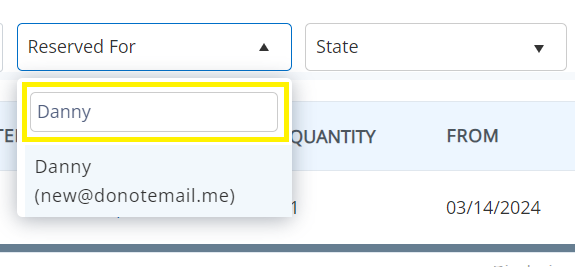
2. Reserved for
When you click on the “Bookings” filter, you will be able to access all bookings. This field is searchable, so you can enter a member’s name to view reservations made under their name:
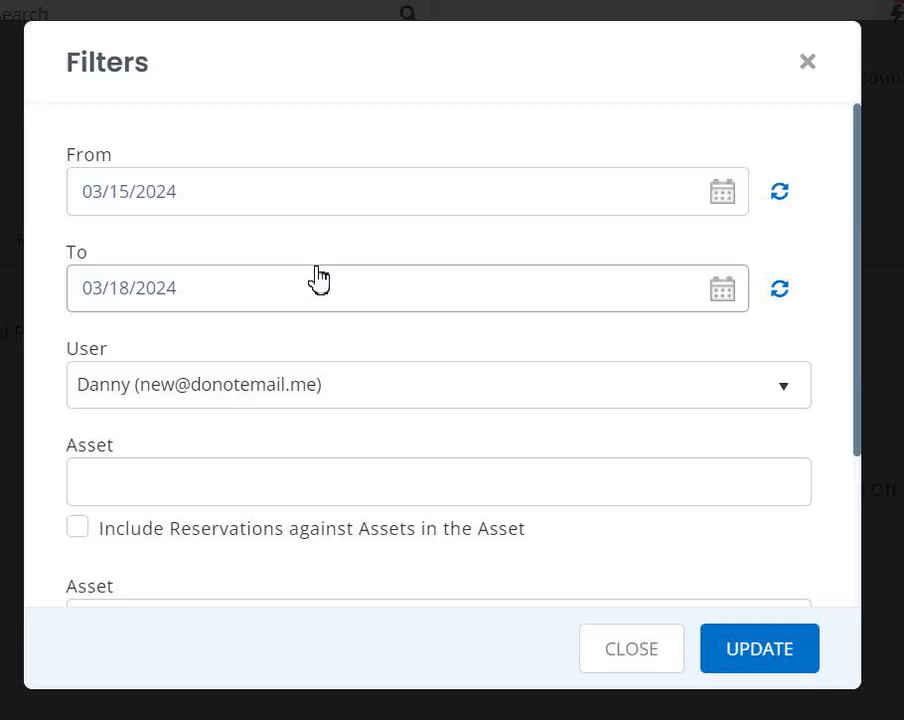
3. Filter
You can apply multiple filters to find your reservations. Just click on the filter icon.

This will take you to a window where you can enter the booking duration, username, asset name and booking type (single or recurring) to find related bookings.
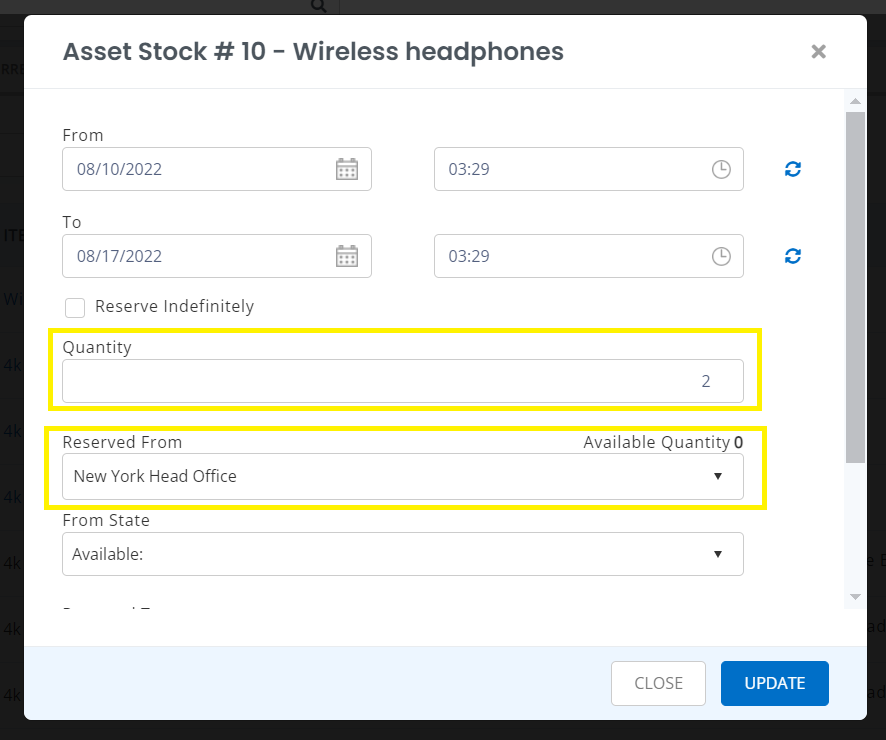
4. Edit product quantity
Administrators may edit the quantity and location of reservations at any time and correct such situations. To do this, go to the booking details page → click on the edit icon.

You will be taken to the following page where you can edit the quantity.
5. View icons
You can cancel your reservation by clicking on the eye icon below.

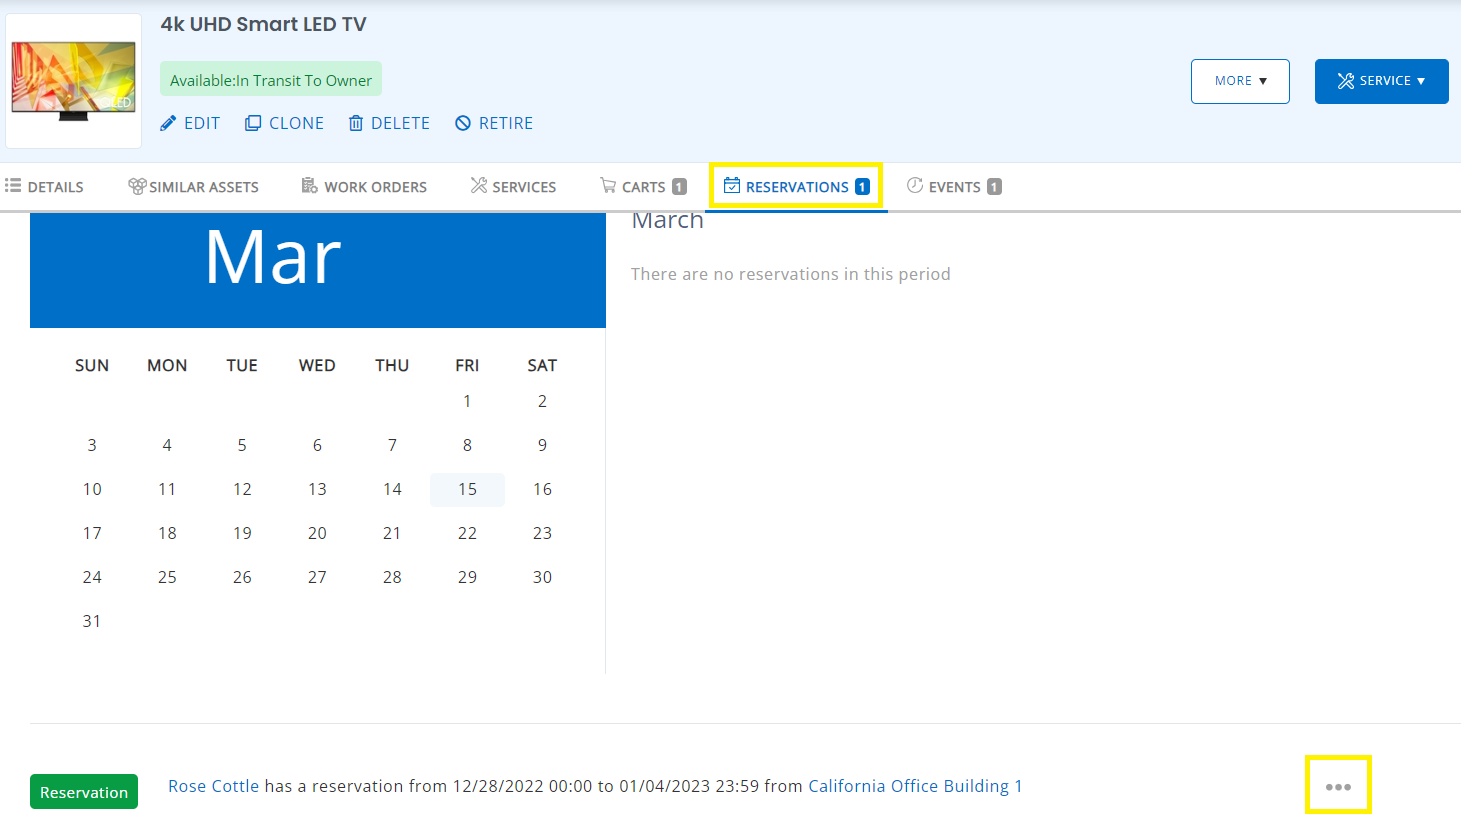
3. Use the shopping cart to make a reservation from the asset details page
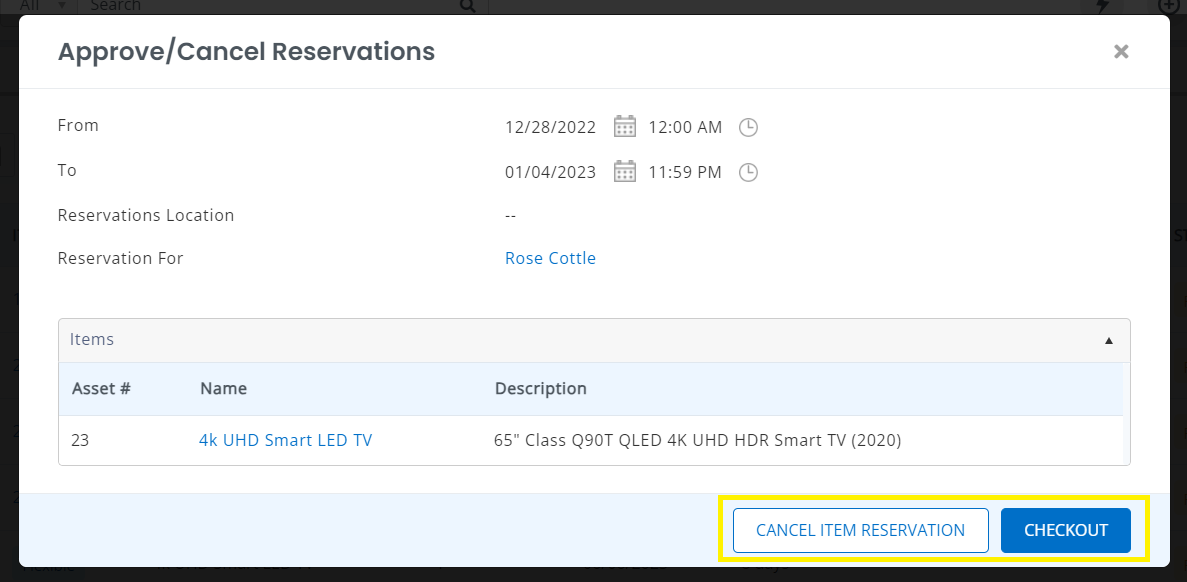
You can perform actions on asset reservations directly from the details page. If an asset is part of a reservation cart and you want to cancel the reservation, you can do so without canceling the entire cart.
Go to the asset details page, open the Bookings tab and click on the 3 ellipses below:
This will open a popup window showing the following options:
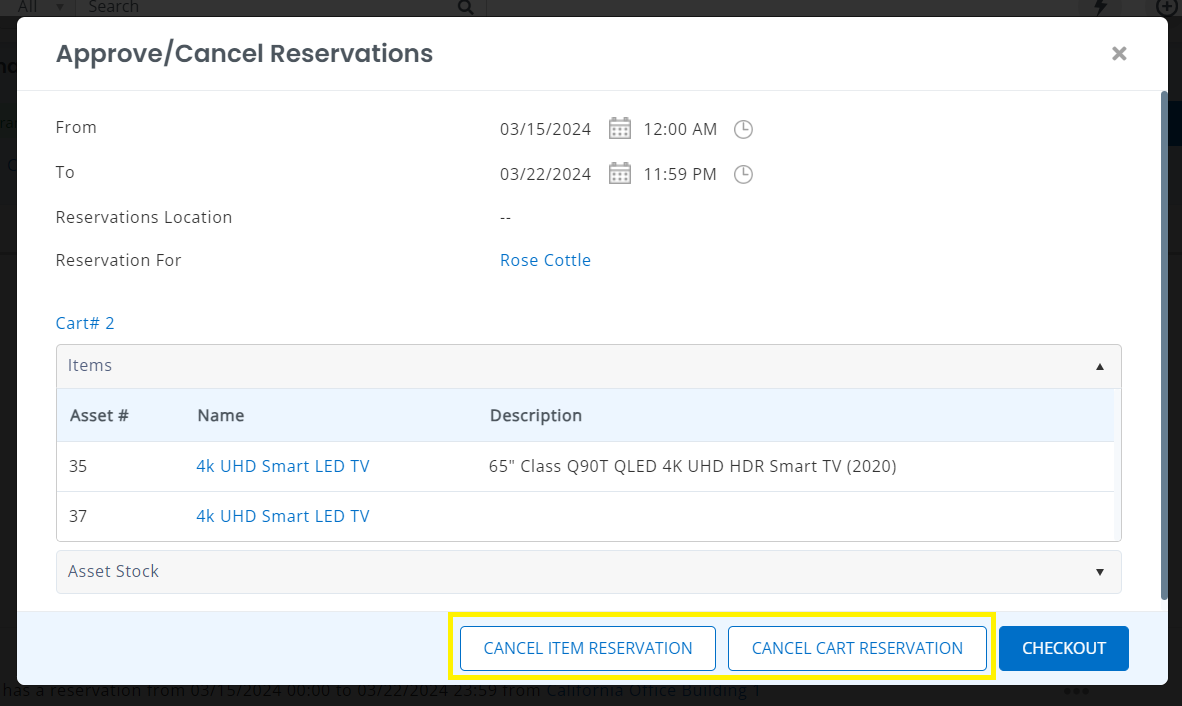
Click Cancel Item Reservation to remove the reserved asset from your cart.
As a staff user, you can only view and act on your reservations. A record of past bookings is also available under the Completed Bookings tab.
Some reservations may appear in red. This is because the reserved quantity is not available when a new sale is made at that location. You can find out what other color dates/stock quantities mean from the help section of the pre-order page.
3. Keep track of booking status
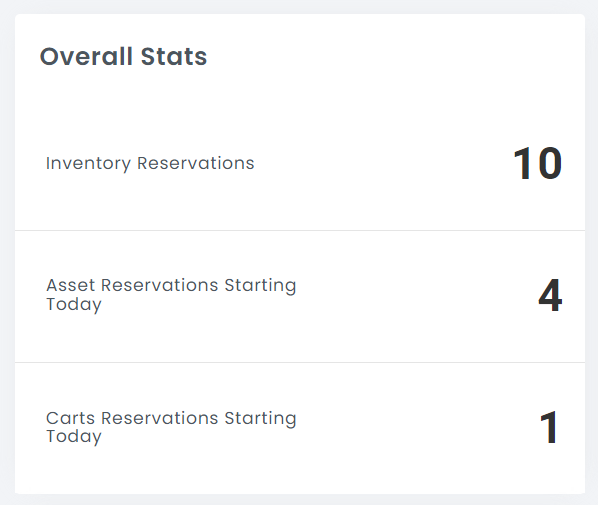
Stay up to date with bookings via the dashboard calendar. You can switch actionable metrics between the Items and Cart widgets.
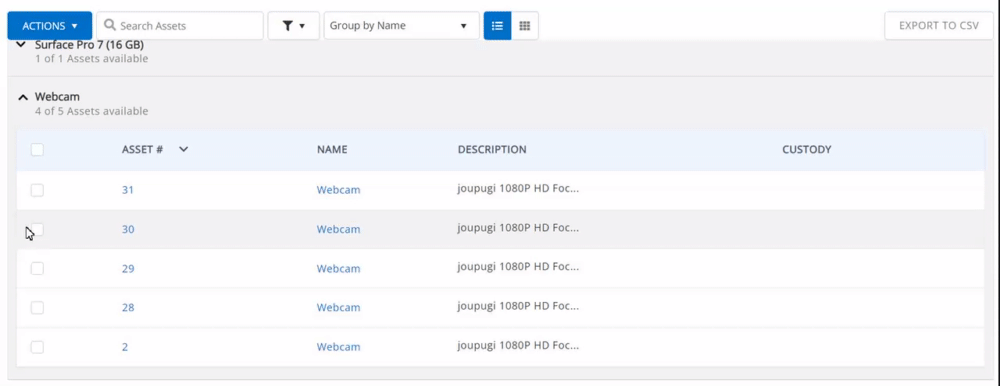
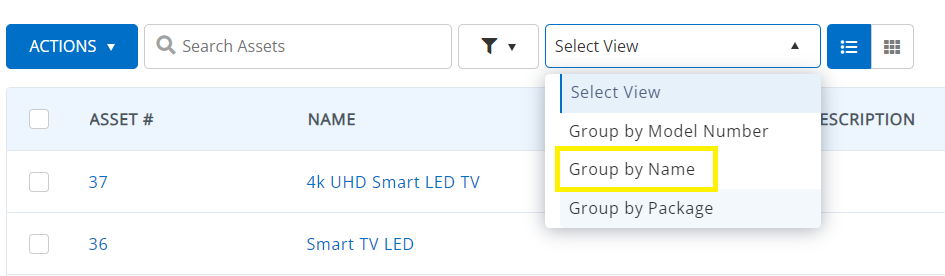
4. Group booking
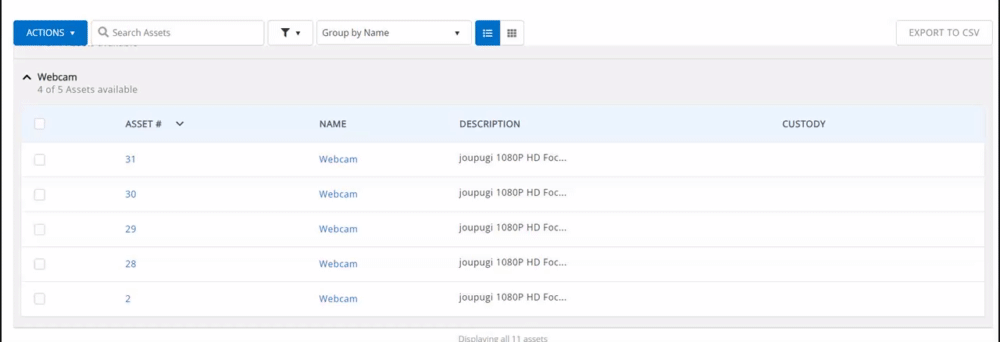
You can use Group by Name view to preserve items.
1. Reserve an item
To do this, go to Project → Assets → Click Group by Name.
Create a new reservation.go Assets → Asset details page → Reserves.
Once you select the Booking option, an overlay will appear where you can enter the details of your booking. You can choose to reserve specific items for a selected asset based on its identification number and disable the Flexible Booking option.

You can reserve an item without specifying its identification number. To do this, enable “Flexible Booking” and any item in that specific category will be selected. This is especially useful when you want to pre-order an item from a listing with the same name.
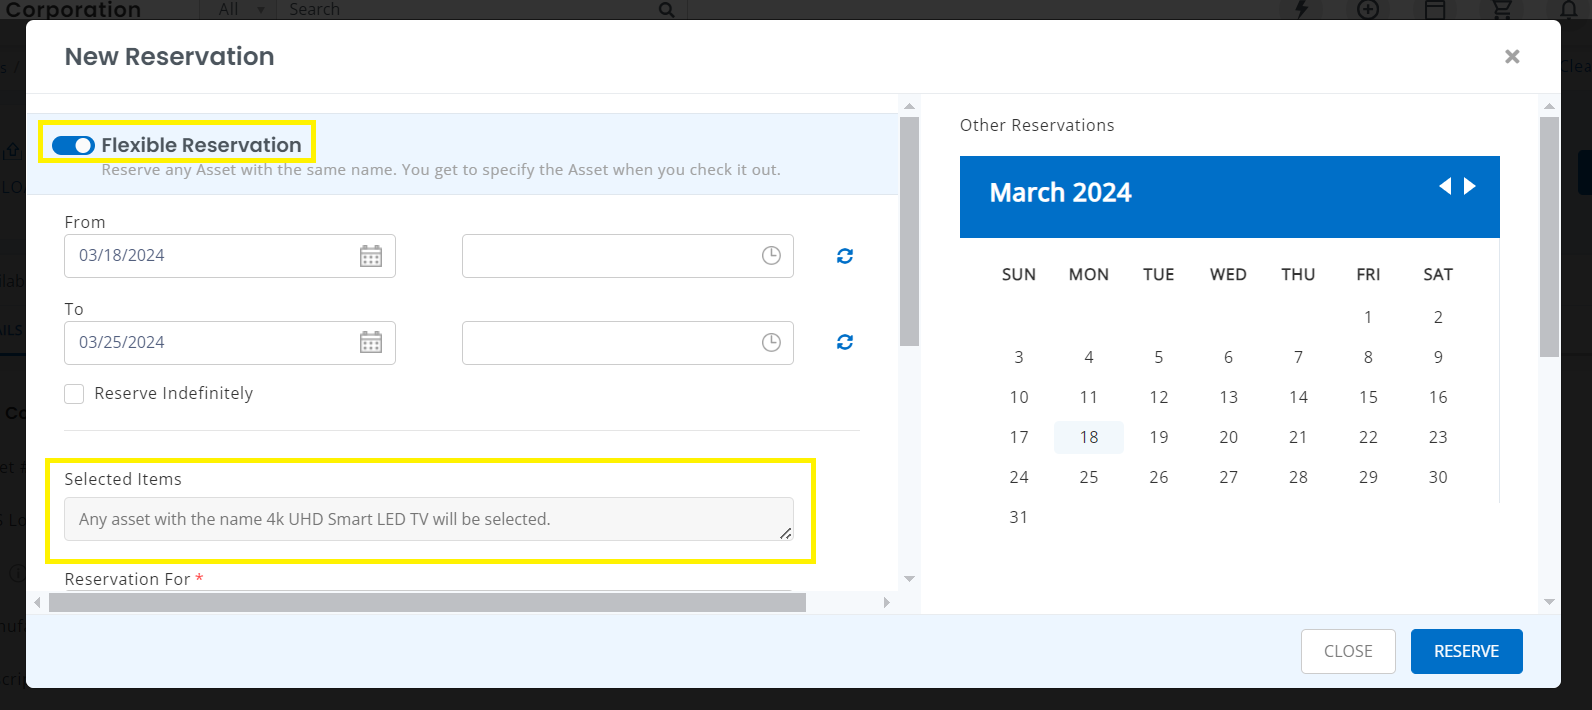
Additionally, if you wish to select items from a certain location, enable the Select from specific location option under the Advanced drop-down list and select the location. Select a location from “From location” and define the quantity.
2. Group booking by name
To reserve multiple assets at the same time with the Group by Name view enabled:
Go to Project → Assets → Select the assets you want to keep.
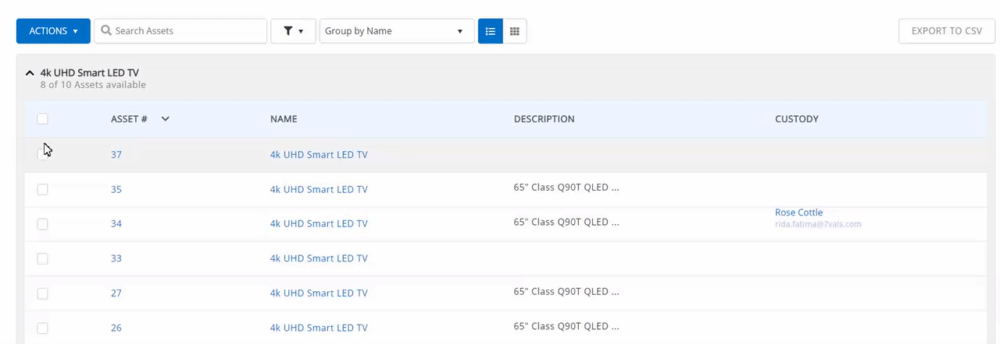
Once you click Show Details, the booking overlay will show you the selected assets.
5. Obtain booking signature
Add an extra layer of security to asset tracking by recording booking signatures and booking approvals Settings → Add-ons → Capture signature. This allows a user to sign when he/she places a reservation on an item or when an administrator approves a reservation (if reservation arbitration is enabled).
6. Cancellation of reservation
Both staff users and administrators can cancel reservations. Just go to the notification ring and tap on “Pending Booking” as shown below:
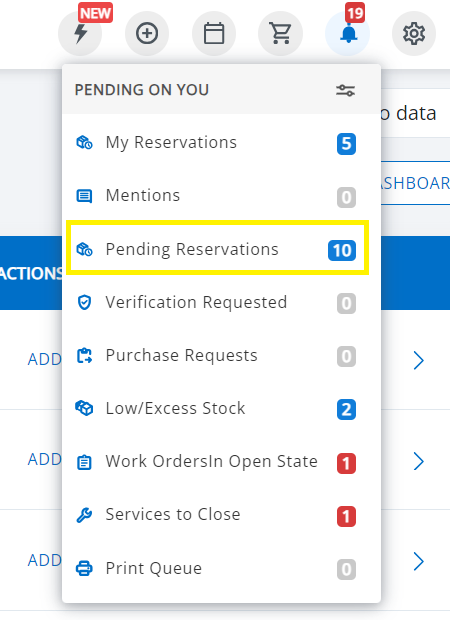
This will redirect you to the Bookings page.
You can check out your pre-ordered items directly by clicking the “eye icon” on the pre-order details page. You will be taken to the following screen where you can cancel your item reservation or check out the item.
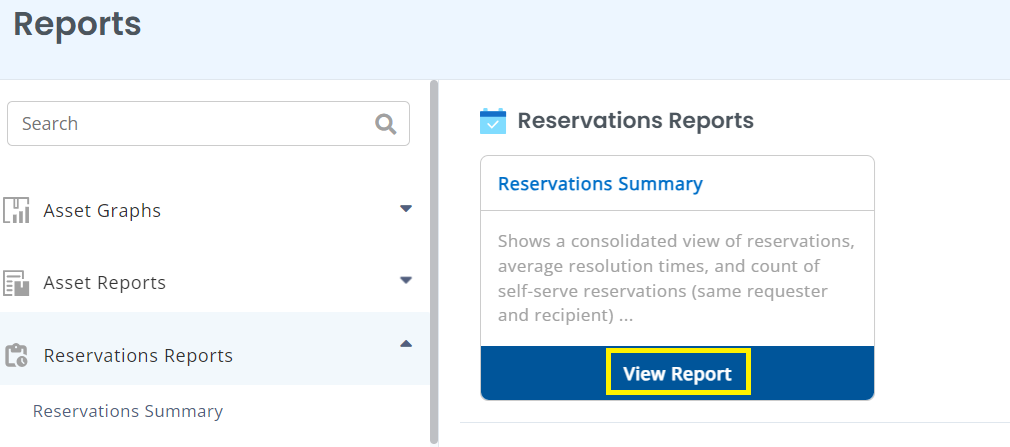
7. Report summary
You can easily get a complete overview of your booking with the Booking Summary. To view a summary of the booking report, go to Reports → Booking Reports → Booking Summary → ‘View report’.
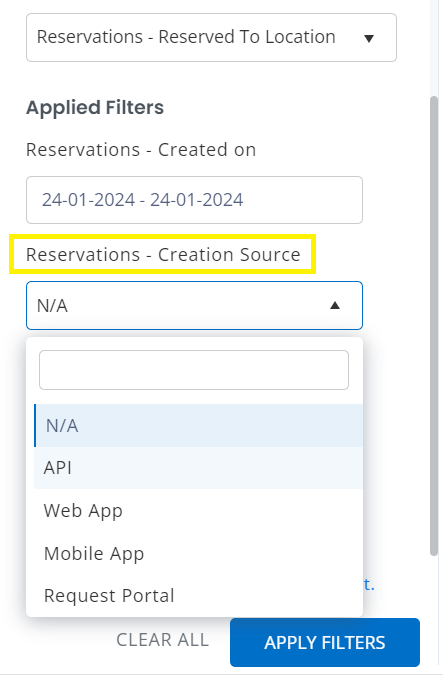
You can summarize your report based on specific criteria. To do this, click the filter flag on the Report Details page.

A pop-up window will appear on the left showing the filters that apply to your report. You can select your requirements from the drop-down lists of “Available filters” and “Apply filter”.
For example, if you click Subscription – Creation Source, you can select the creation source data from which you want to import the report. You can select sources such as API, Web Application, Mobile Application, and Request Portal. If no source set is created, you can select N/A.
notes: If you want to collect data from all sources, clear all filters.
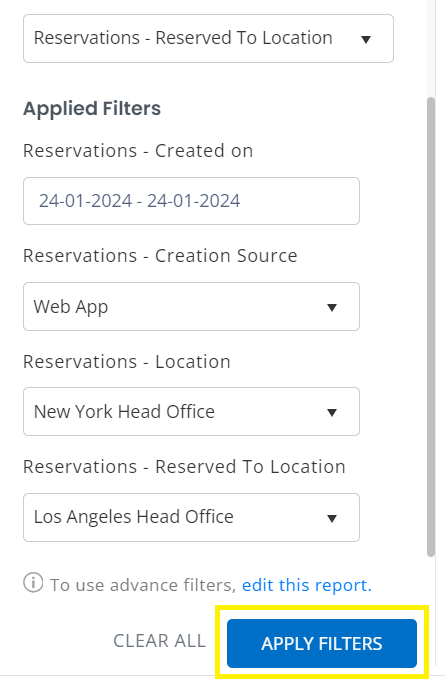
Likewise, you can select options from Create in, Location, and Keep to location.
After selecting the relevant options, click “Apply filter”.
For example, the following image shows a summary of the total number of reservations created. here, “Completely self service” is the same request as the recipient and the requester, and “Mean time to resolve issues” Is the time it takes to respond to a booking request.
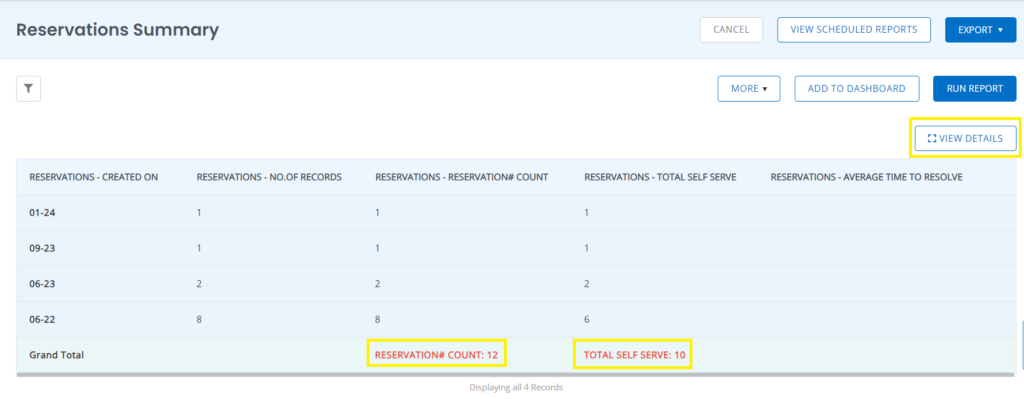
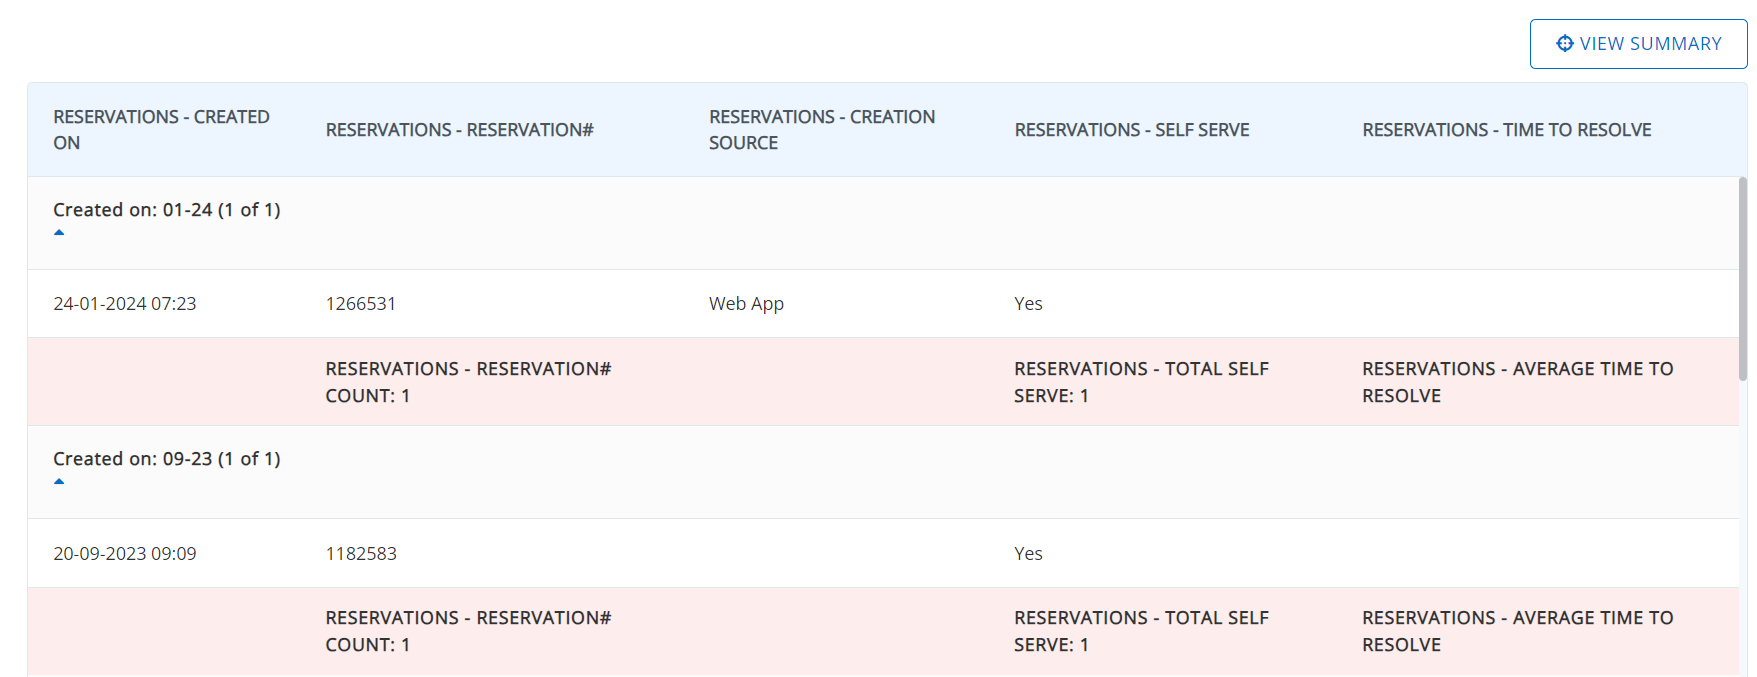
To get a detailed view of the report, click ‘check the details’. A detailed booking report looks like this:
By following these simple steps, you can easily generate report summaries and improve your data analysis.